
Guide for Integrating Intune SDK and MSAL to LOB applications

My name is Saurabh Sarkar and I am an Intune engineer in Microsoft. I have a YouTube channel ‘EverythingAboutIntune’ and you can subscribe to the same to learn more about Microsoft Intune.
Background:
- Intune SDK is available for both iOS and Android and it enables us to support Intune app protection policies on all kinds of applications.
- If our app has app protection policies applied to it, it can be targeted via MAM policies and managed by Intune and is recognized by Intune as a managed app.
- Microsoft releases the updated versions of the Intune sdk which is available in GitHub. There are several benefits of integrating Intune sdk into our application which can be found here
- For store apps, the app owners utilize the Intune SDK to develop the application before publishing it in the public store which makes the application MAM aware
- For LOB apps(in house developed) we have the option of integrating it with the Intune sdk during our app development phase so that the application can understand MAM policies.
In this article we are going to see how we can integrate an application with Intune sdk and MSAL so as to apply MAM policy via Intune onto the same.
Did you Know:
All the Microsoft Office applications like Outlook, Excel and OneDrive are all integrated with Intune SDK and MSAL by the developers and then released into the store which makes them MAM aware!
Kindly refer to the blog here to understand the differences between App Wrapping and Intune SDK integration.
Kindly refer to the blog here which explains how we can integrate Intune sdk to our application using Appdome
Flow:
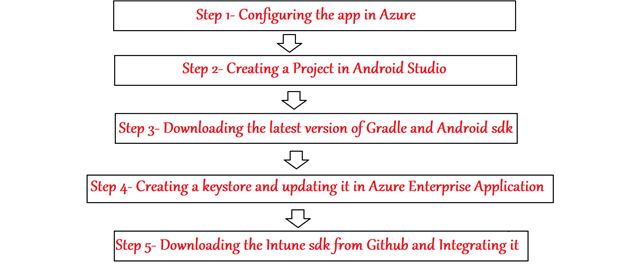
We can develop our own app and integrate it with Intune sdk and MSAL by following the below steps for apps developed in Android Studio
Did you Know:
Apps developed in Android Studio\Xamarin\Xcode\Flutter\React can all be integrated with Intune sdk
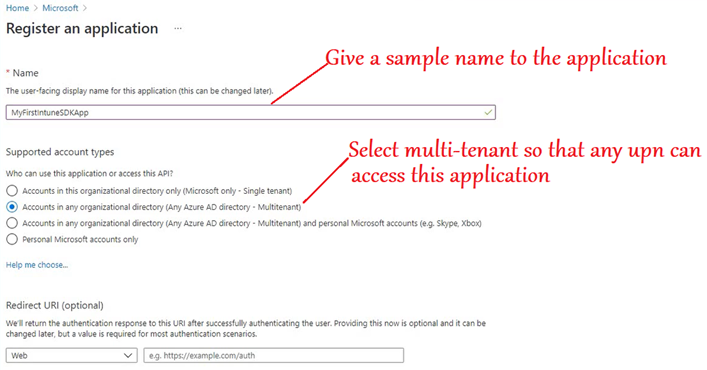
Step 1- Configure the app in Azure
- This Enterprise application will communicate with our mobile application which is integrated with sdk.
- The Enterprise apps in Azure lets any application communicate with azure.
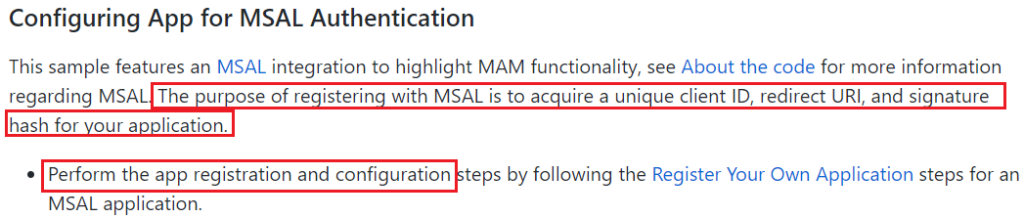
- We need to register an Enterprise app which our app will use to leverage and communicate to Graph\Enroll with MAM.
- This needs to be done so as to acquire a unique client ID, redirect URI, and signature hash for your application.
- The same has been documented officially here
- Now lets follow the same as shown below by logging into the Azure portal as an admin.
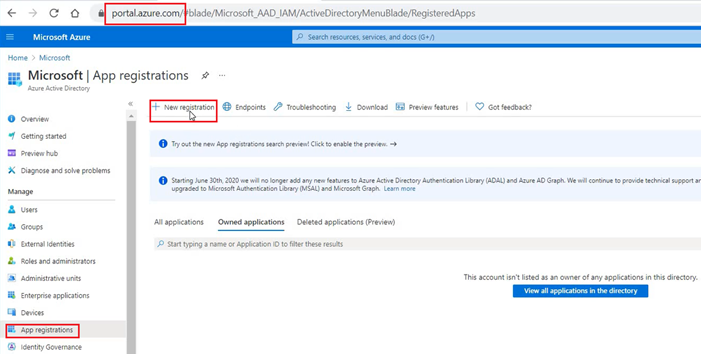
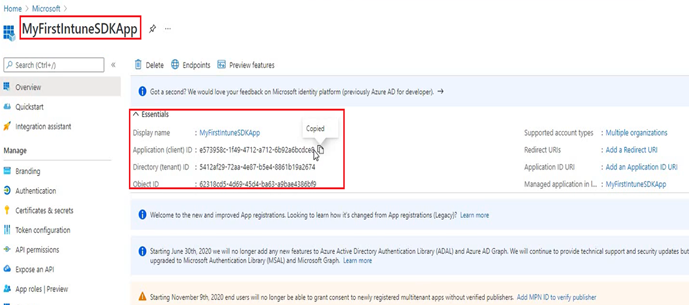
- The app is now registered in Azure and has a client id. We are going to use this clientid in our application while developing it.
- We get the application client id which we link to our LOB application which we are developing.
- Our application will communicate to this Enterprise app via the client id when it needs to authenticate and grab a token for MAM
- Our app needs API permission on the “Enterprise App”
- So we need to provide ‘DeviceManagementManagedApps.ReadWrite”– this is the scope.
- So we will go to Enterprise App> Our application>API permissions>Add a permission
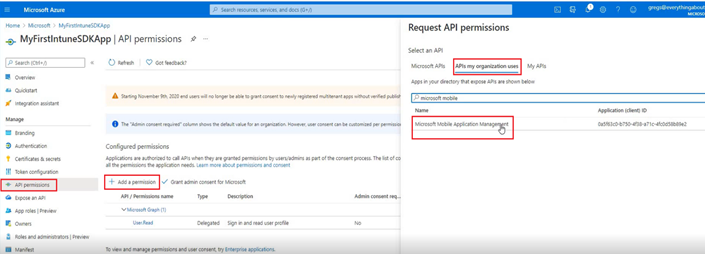
- Each token has a scope. Right now we are requesting for a token from Azure(this specific Enterprise application) with a scope of ReadWrite
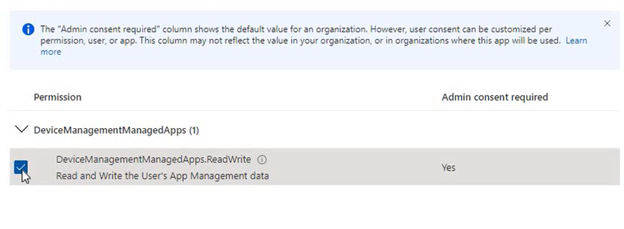
- Now we provide Admin consent- so that any user can come and get this token as per request.
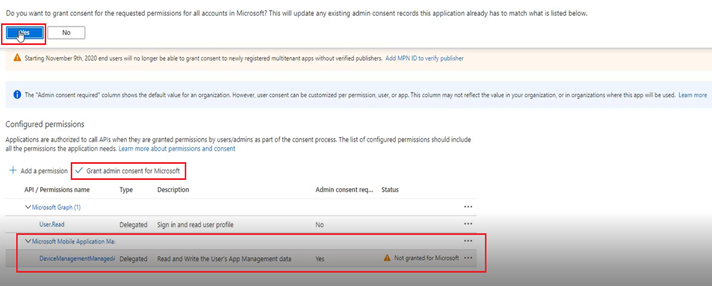
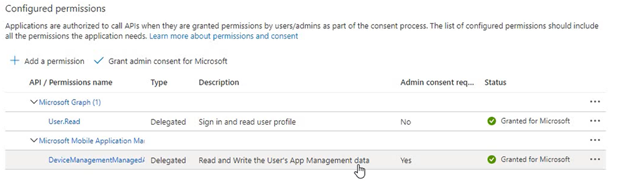
- Once done, both of them show as “Granted.”
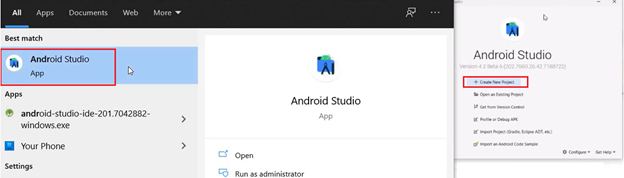
Step 2- Creating a Project in Android Studio
- We will launch Android Studio>Create a new Project
- From the template we will select “Empty Activity” and will select a Project name, package name and the minimum sdk version.
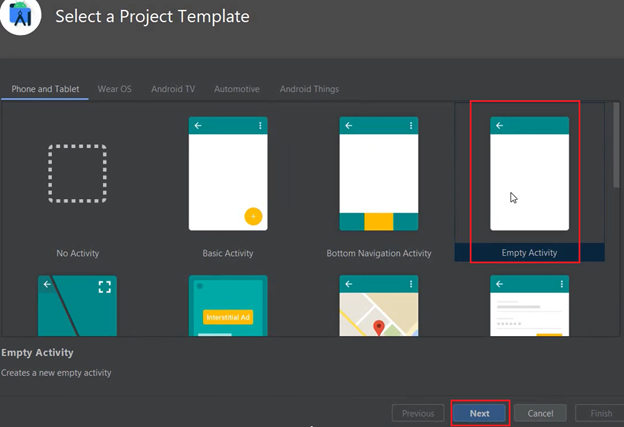
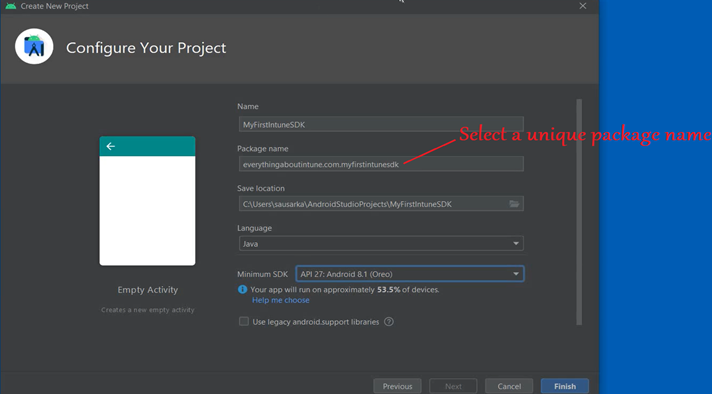
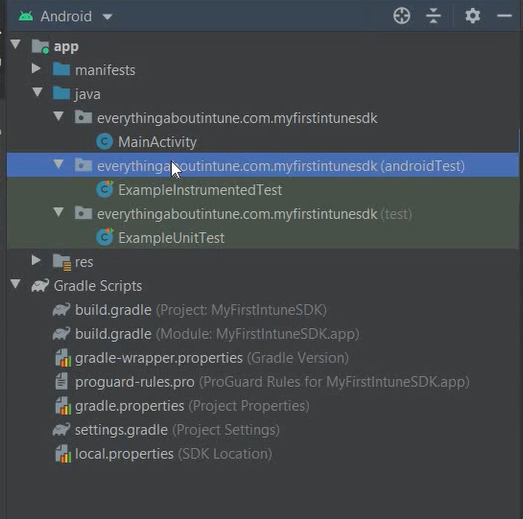
- We click on Finish and we see the below
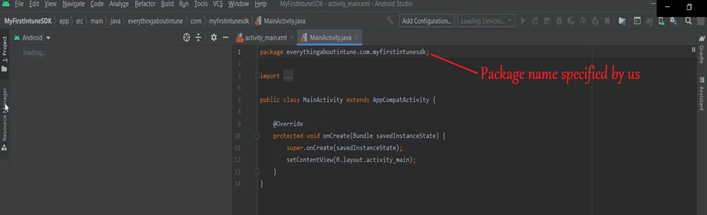
- Now our Android project has been created and we can modify it as per our application’s need
Step 3- Download the latest version of Gradle and Android sdk
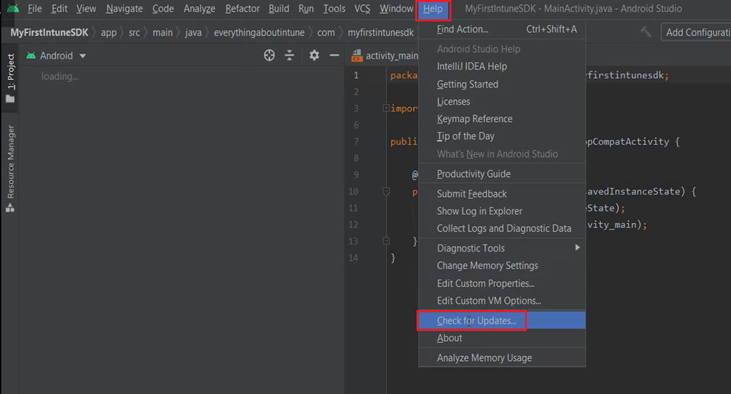
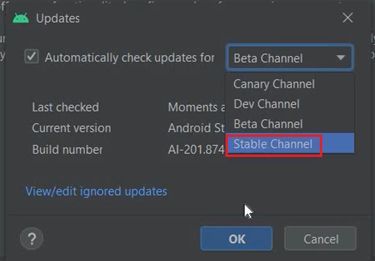
- We will now download the latest version of Gradle by going to Help>Check for Update.
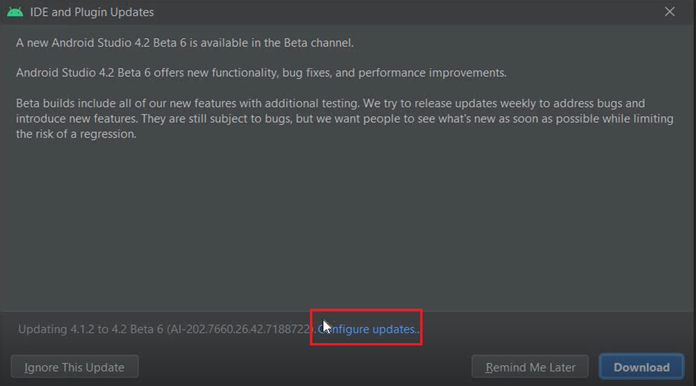
- Click on “Update” at the bottom of the screen.

- We will make sure that the update is for stable channel and not Canary Build(which it is by default)
- Now Gradle would download the relevant files in the background process.
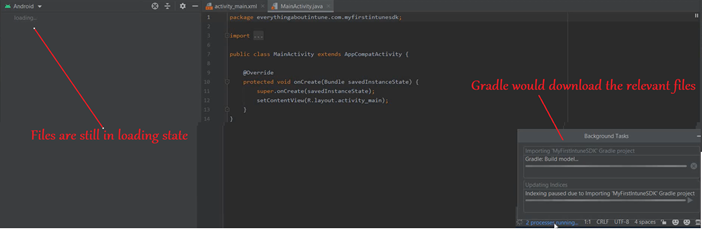
- Once the files are downloaded, we see the relevant files.

- Now we will download the Android sdk with API 27 or later.
- Every Android OS version has its own sdk version. To be able to work on an application which is targeting specific android version, we need the corresponding sdk installed
- This is not the Intune sdk. This is the Android sdk released by google (for each Android version)
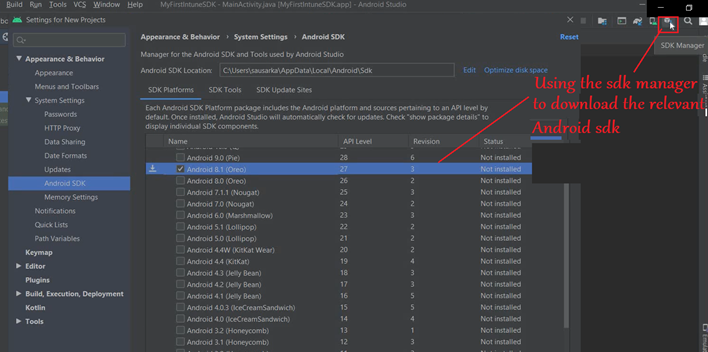
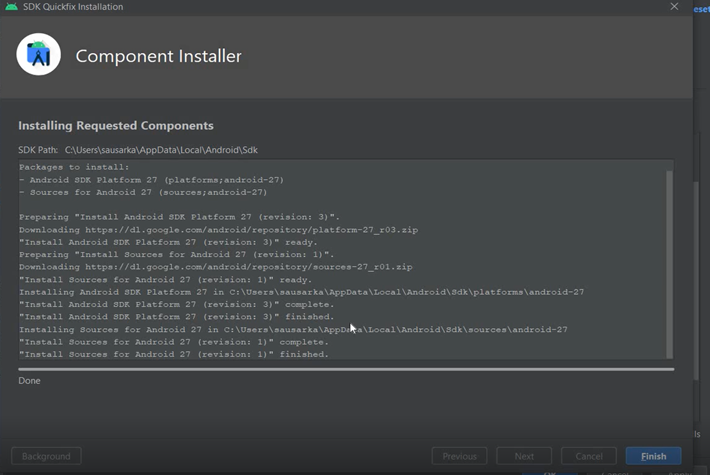
- The Android sdk will download and install as below-
Step 4- Create a keystore for signing the application and updating it in Azure
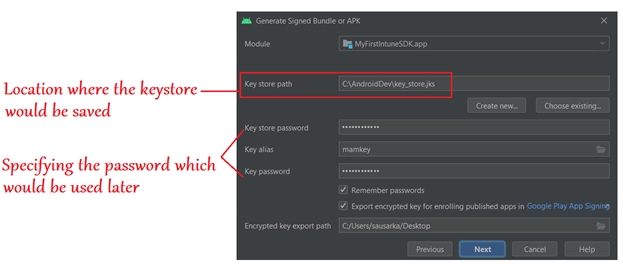
- Now we will create the keystore. It is a certificate which will be used to sign the application.
- We create a keystore certificate and save it in a location.
- This certificate will sign the application that we are building.
- We can use the Android Studio to do it for us, or use cmd.
- This creates the certificate for us as well as the certificate hash which we will later use in our application
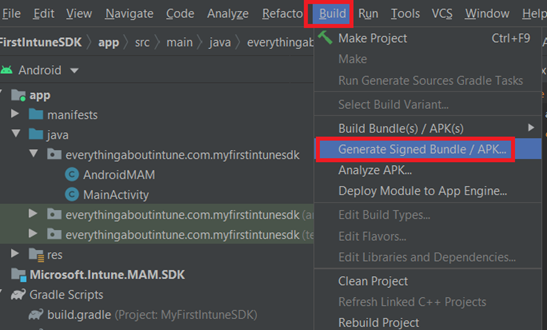
- We will go to Build>Generate Signed bundle
- We now can see the keystore file which was generated.

- Now we need to generate the hash
- We need to run the command: keytool -exportcert -alias mamkey -keystore c:\AndroidApp\key_store.jks| openssl sha1 -binary | openssl base64
- As shown below, the needed hash will be generated as the output
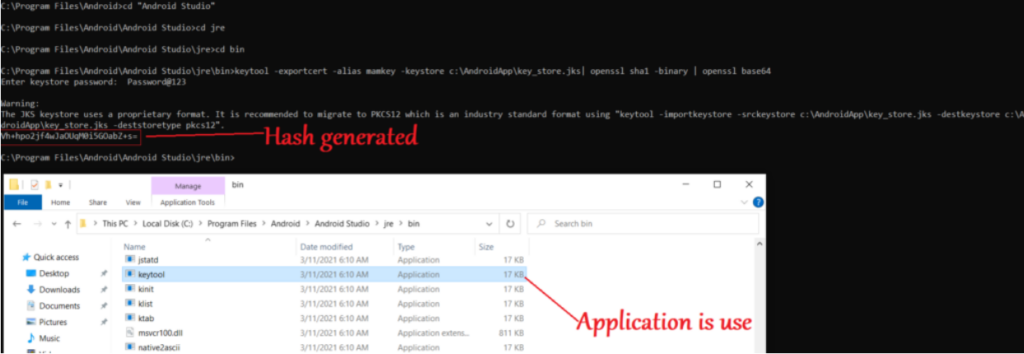
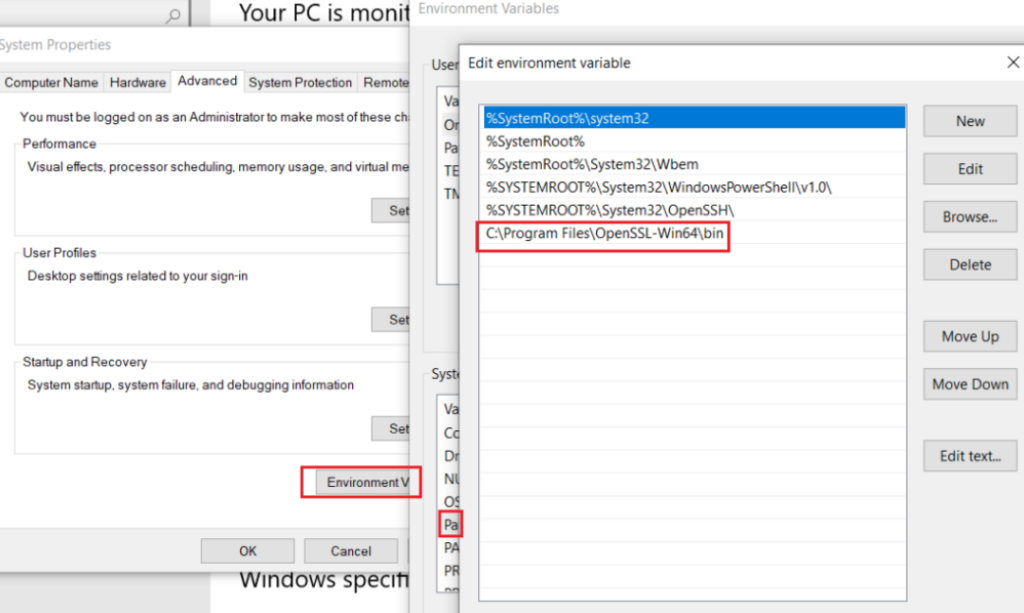
- If needed, we might have to install Openssl from here
- If needed, we might have to set an environment variable as below
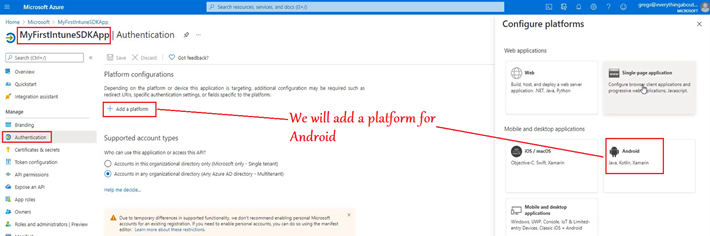
- Now we will go to the App registration in Azure and configure it with the hash generated above
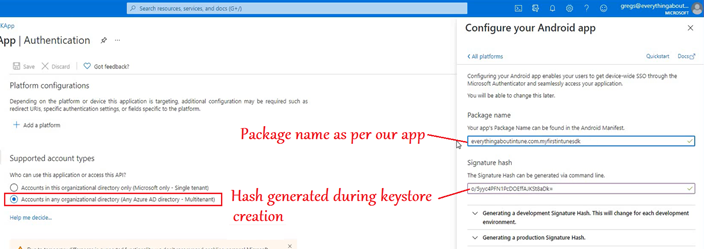
- Over here we will provide the hash and the package name
- Now we will go to the App registration in Azure and to the Enterprise app that we have created.
- Here we will provide the package name and the hash(generated above) of our application.
- This is done so that the hash which is there in the client(i.e. the application from where the auth request is generating) and the hash in the Azure AD App Registration both should be the same.
- This is done so that the hash which is there in the client(i.e. the application from where the auth request is generating) and the hash in the Azure AD App Registration both should be the same.
- These steps have been documented officially here

If we have developed our app (for Android or iOS) in Xamarin platform, then we would have to download and integrate the Microsoft Intune App SDK Xamarin Bindings into our application in order to make it MAM aware
More information on the same can be found here
Download the latest version of Microsoft Intune App SDK Xamarin Bindings here
Step 5- Downloading the Intune sdk from Github and Integrating it
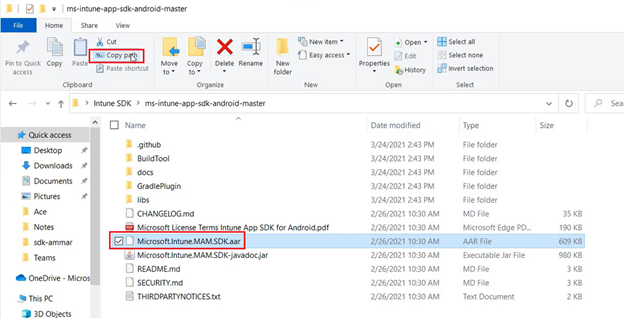
- We will now download the latest version of Intune sdk for Android from Github here
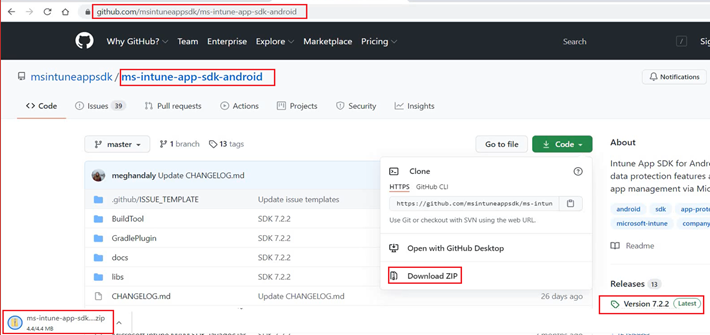
- Once downloaded, we can extract the zipped folder to make sure that the contents are intact.
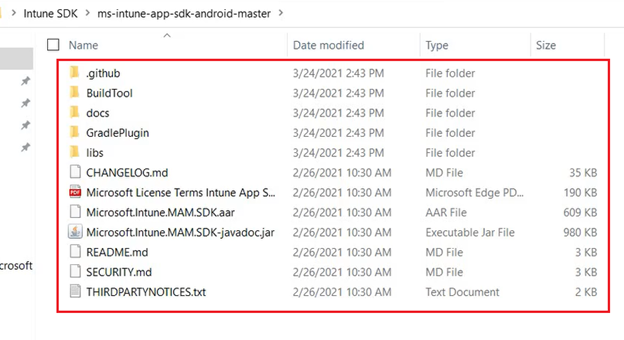
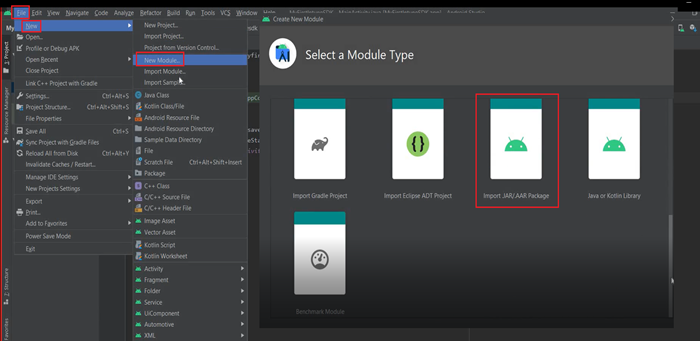
- Now we are going to ingest\integrate the sdks.
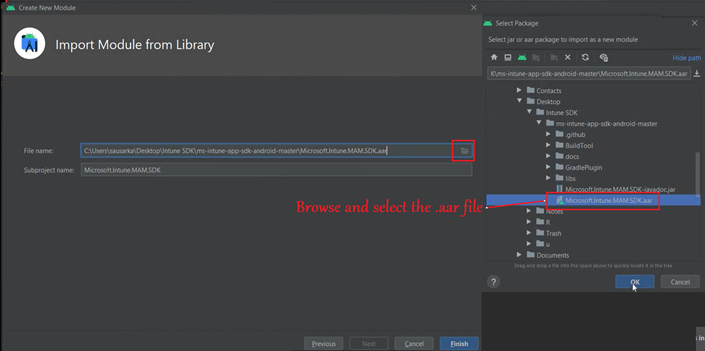
- File>New>New Module>Import .jar.aar package>Navigate to the sdk files
- Navigate to the .aar file in desktop
- Now in the left pane we should see our sdk.

- Now we will check if the module dependency is automatically loaded or not..
- We should see “Module Dependency” if the Module was loaded successfully.
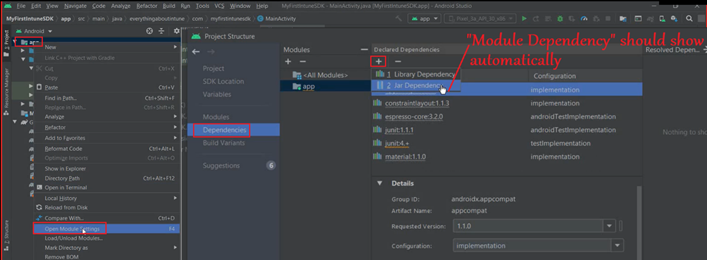
- Select Module Dependency>Select “MAMSDK”>Click OK
Note- Sometimes Android Studio does not load the dependency. In that case we will follow the below and add the same manually.
- We will add a .jar dependency-
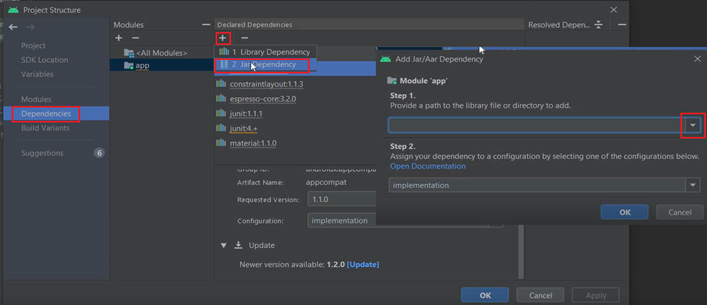
- Now lets copy the path to our .aar file
- We will provide this path of the .aar file below-
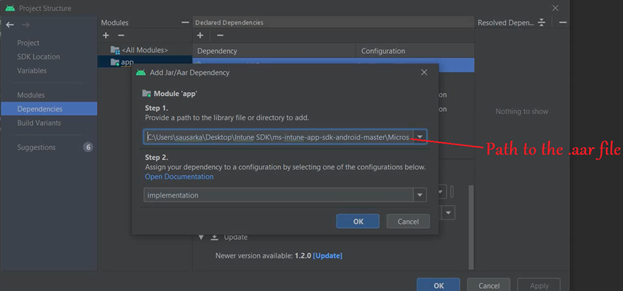
- Now if we go to the Gradle Module, and check the implementation path, the path to our .aar in sdk would be added.
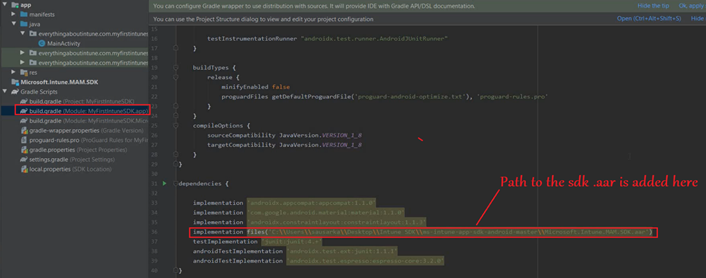
The Intune sdk has now been integrated successfully!
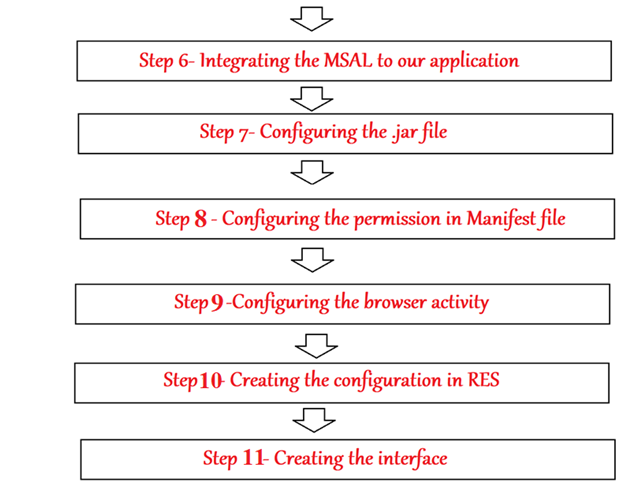
Step 6- Integrating the MSAL to our application
- We will link the MSAL to our application. Since we cannot do the auth in Intune sdk and for that we rely on MSAL, it needs to be integrated in the app code.
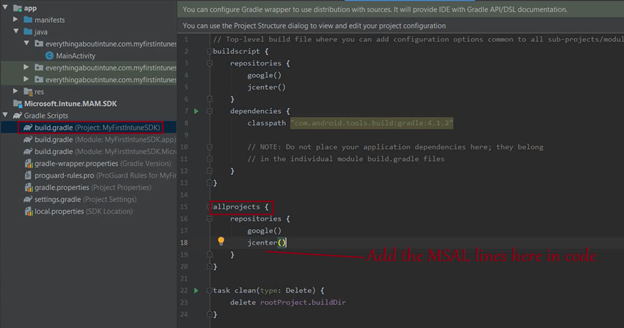
- Go to build.gradle(project)>All project>After jcenter we will add the MSAL libraries.
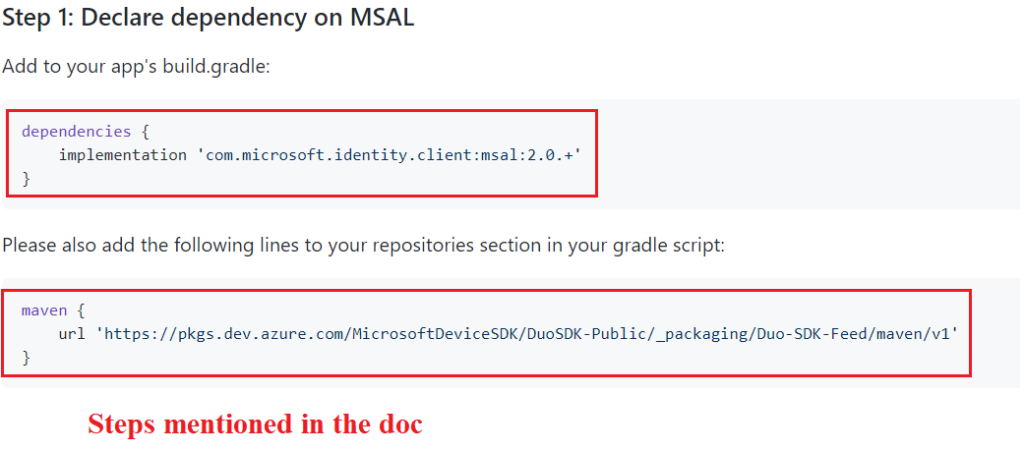
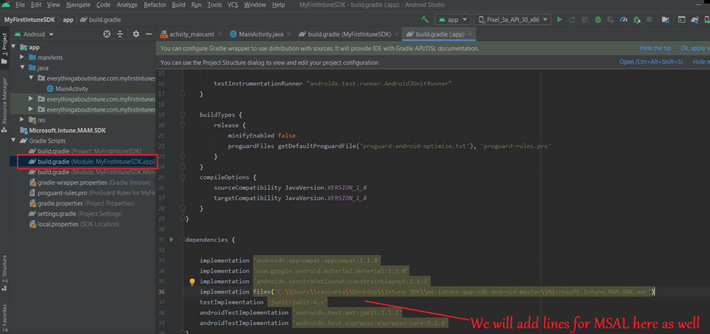
- Go to build.gradle(Module)>dependencies>after implement>We will add the relevant MSAL libraries
- This step has been mentioned here in the official documentation.
- Now lets implement the same as below-
- We need to add the below line here-

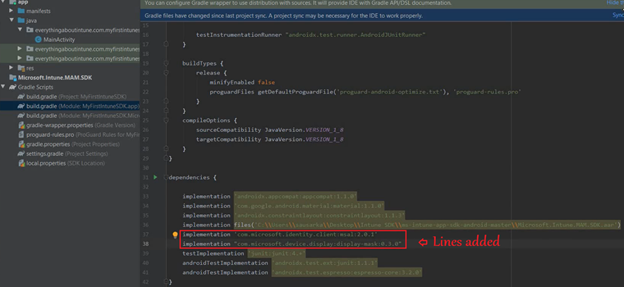
- Now we will add a couple of lines in gradle(Module) in the below location as well-
- We will add the following lines here-

- It should look like the below once done-
- Now we will run a sync for the Gradle.
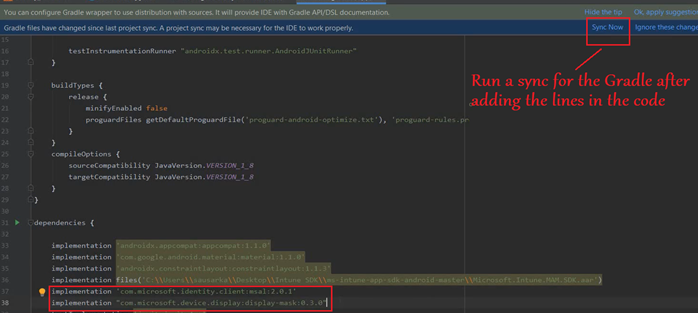
- Gradle will now download the relevant files and build the Module\Project.
- We are integrating Microsoft Authentication Library (MSAL) into the app and not Azure Active Directory Authentication Library (ADAL)
Did you Know: MSAL vs ADAL
Azure AD has 2 endpoints- v1 and v2 and its all about the versions of the Azure AD Endpoints we wish to reference.
We initially had a version v1 which was not very much compliant to OAuth 2 and OpenIdConnect -> This was ADAL
Now we have added a new client library to the newer version (v2)-> MSAL(Microsoft Auth Library) and the v2 endpoint Is complaint. All the new features are added to v2 (i.e. MSAL)
In a nutshell MSAL is kind of continuation of ADAL but more enhanced.!
ADAL:v1::MSAL:v2
Step 7- Configure the .jar file
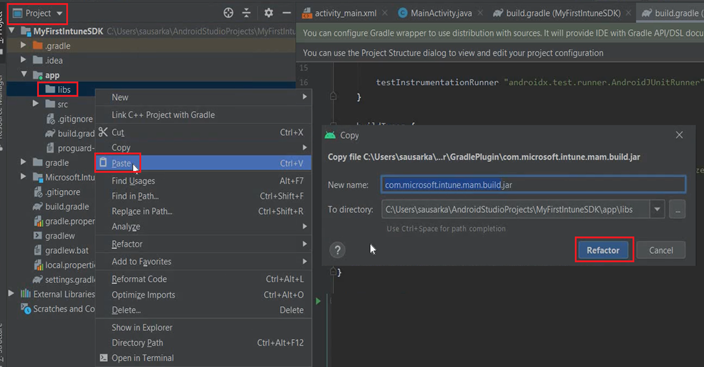
- We will first add the .jar file in the library as shown below. To do so, will first have to click on the below dropdown and select ‘Project’
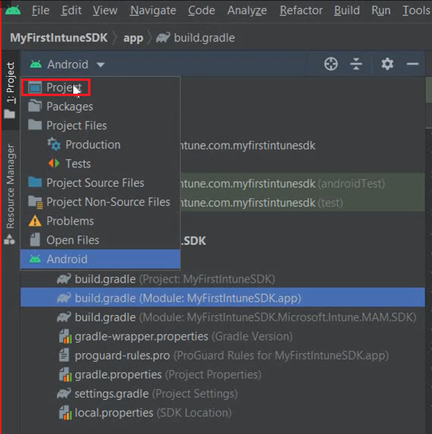
- We will go to libs under app, as shown in the below location-
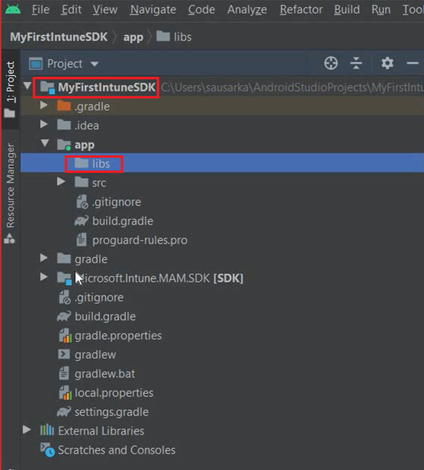
- Now we will copy the below .jar file from the sdk that we downloaded from GitHub-

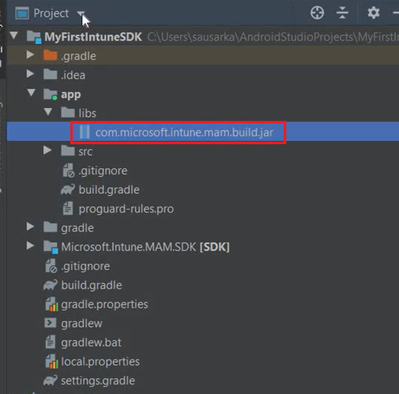
- We will right click on libs and paste the above copied .jar file here and click on Refactor-
- Now we should be able to see the .jar file inside the libs
- Now we are going to implement the above .jar file as shown in our documentation here
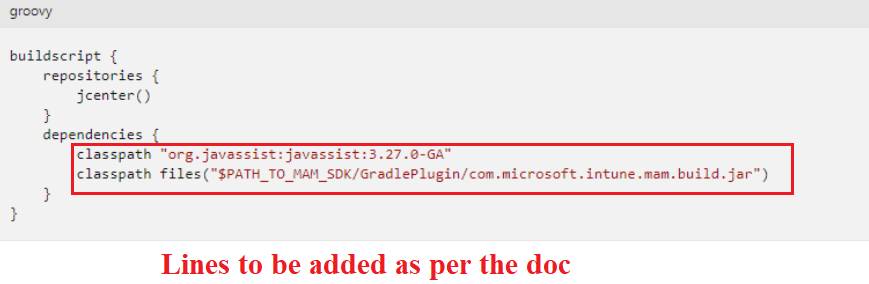
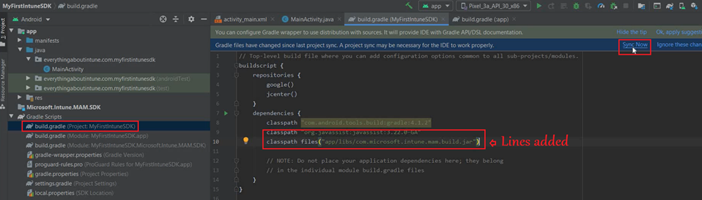
- We will have to add the below 2 lines into our Gradle

- We will switch back to Android and add the above lines in the gradle project after class path-
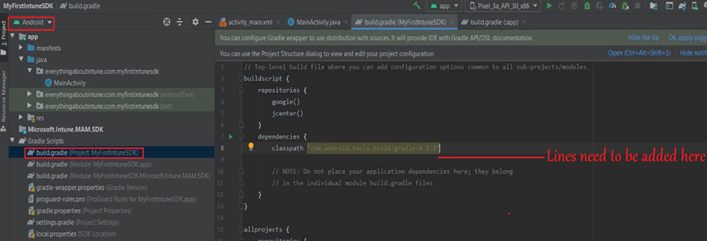
- It should look like the below, once correctly done. Now we will sync the project-
The .jar does the renaming of the classes. The .jar file tells the gradle how to rename the classes as required before the actual integration can happen.
- Now to further configure the jks file we will- Right click on the App>Open Module Settings>Signing Configs>Click on (+)
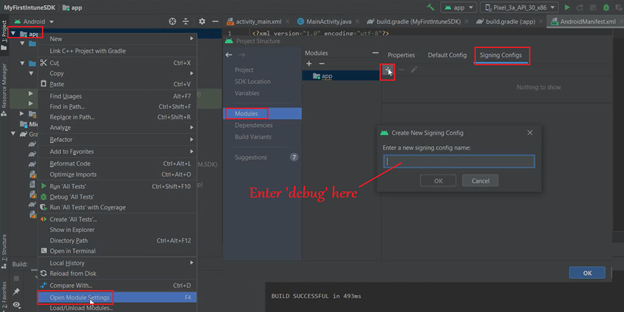
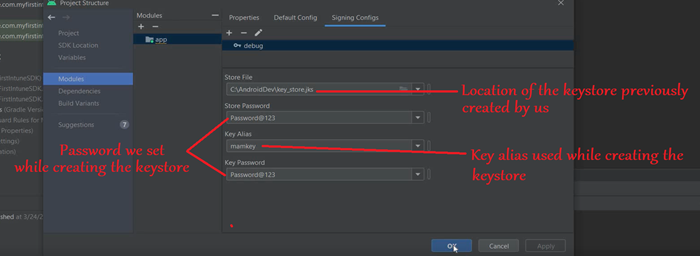
- Now we will provide the keystore location, alias and password here, which we had set during the creating of the keystore.
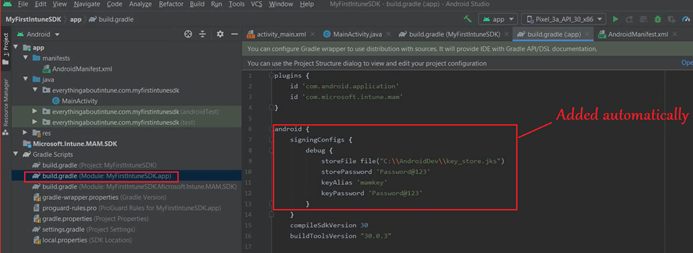
- Now if we go to the Gradle.Module, the below should be added to it automatically-
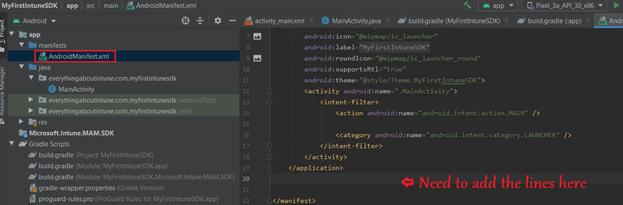
Step 8- Configuring the permission in Manifest file.
- We have to add the permission to the Manifest
- Go to the Manifest> Below the closing of tag we have to add a few lines.
- These are the permissions needed by our application to use the sdk
- These steps have been documented here officially.
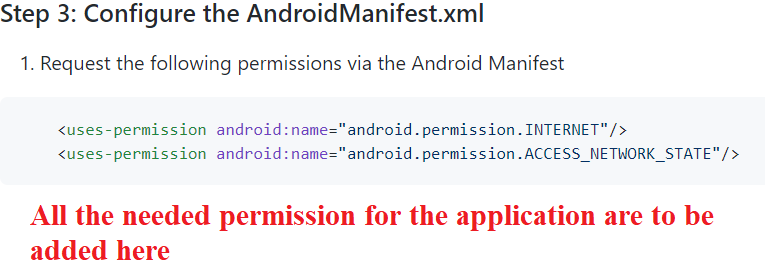
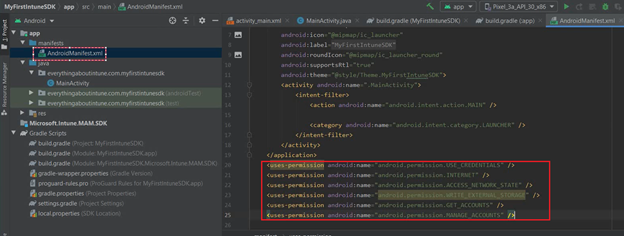
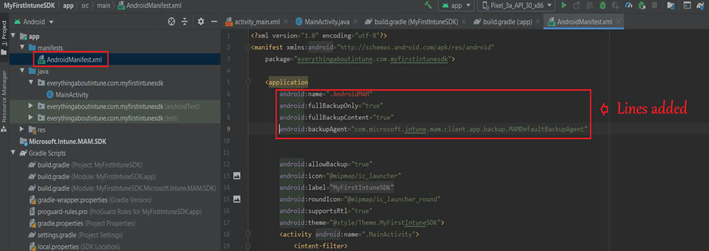
- We will be adding the below permissions for our application in the Manifest

- Once done, the Manifest should look like below-
- Now we need to add the below to the Manifest all of which has been documented here
- These are the different attributes of the application(configure as applicable)

- This needs to be added below-
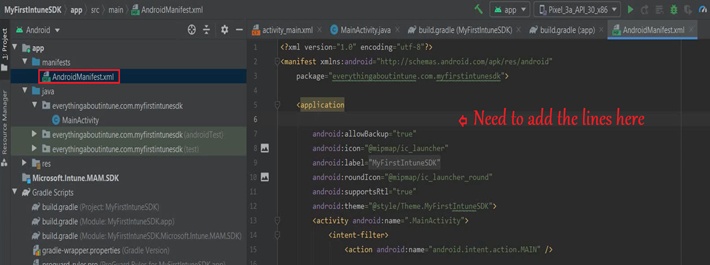
- Once added, it should look like the below in the Manifest file-This is needed for MAM integration into the application.
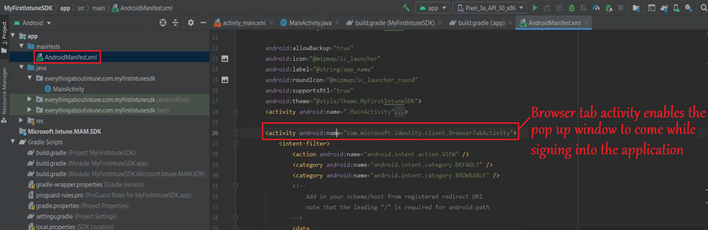
Step 9-Configuring the browser activity
- An activity in an Android application is actually a page.
- Whenever we run the application>Whatever screen we see, it is actually an activity.
- So when we authenticate after launching the application, a pop up window comes up. It is like a browser window. For the same to happen, we are adding the browser activity here.
- This is a BrowserTabActivity
- These steps have been documented officially here
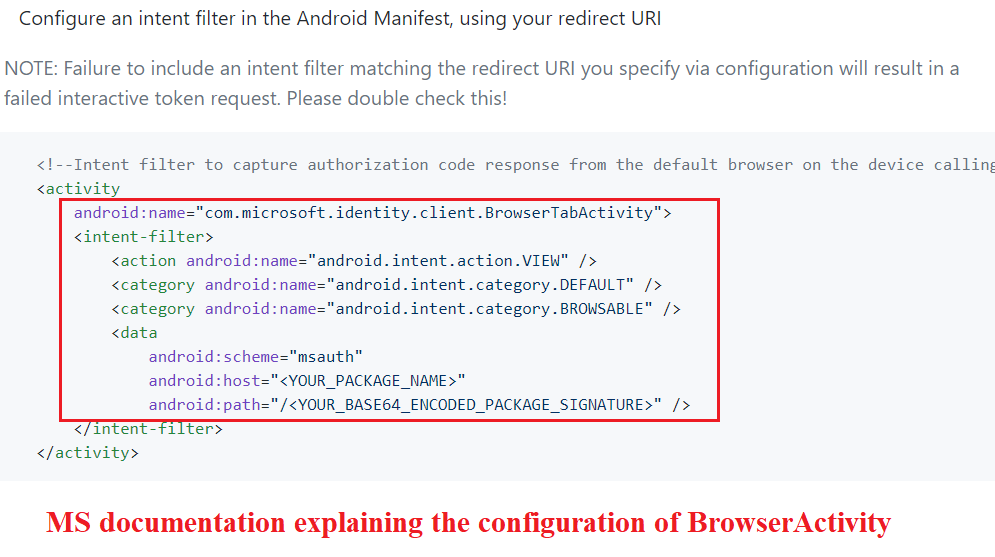
- In the Manifest>we will Add the “Activity for Browser” before the end of our application tag
- Need to make sure we are providing our cert’s hash and path here.
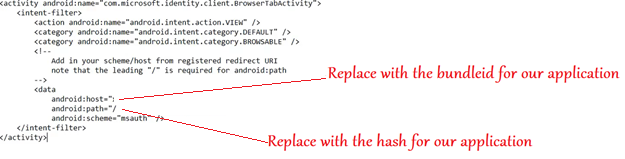
- We will add the above lines for browser activity after the main activity in the Manifest, in the below location-

- Once added, it should look like the below-
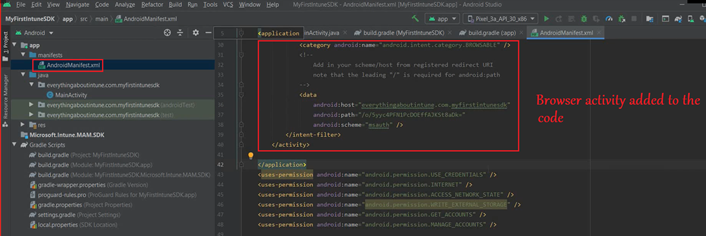
- If we look closely, we can see the browser tab activity which we just added to the code
Step 10- Need to create the configuration in RES
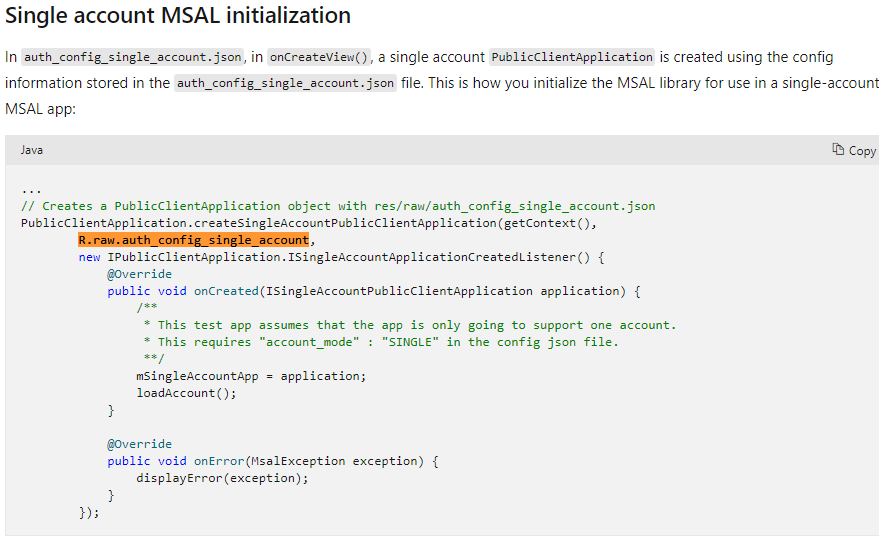
- We have created a public class named “AndroidMAM” and it will contain the Sign in info for the application.
- Kindly refer to the MS documentation here
- In the MS doc snippet below, Single Account MSAL initialization is discussed.
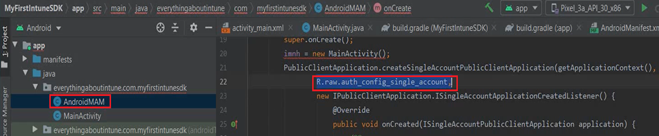
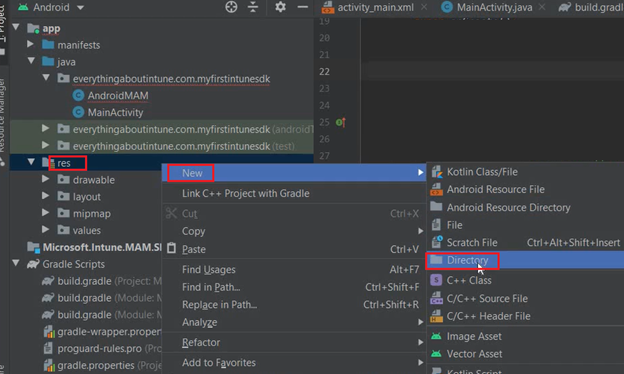
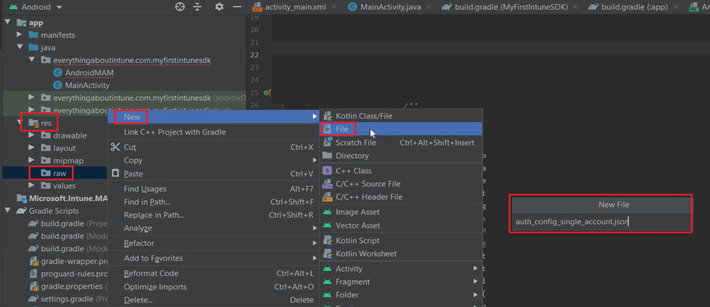
- Now we need to create a directory in ‘res’ and a json file inside it
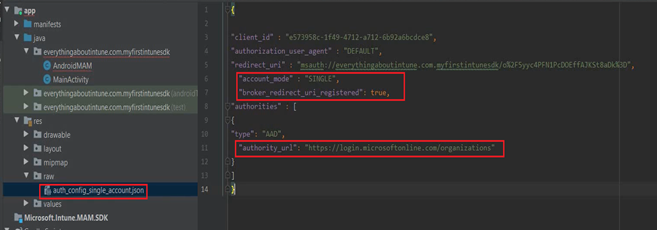
- We will create a new directory in the res folder with the name raw and then we will create a json file inside of it with the name auth_config_single_account.json
- These steps have been documented officially below-
- Now lets create a directory and file as shown below
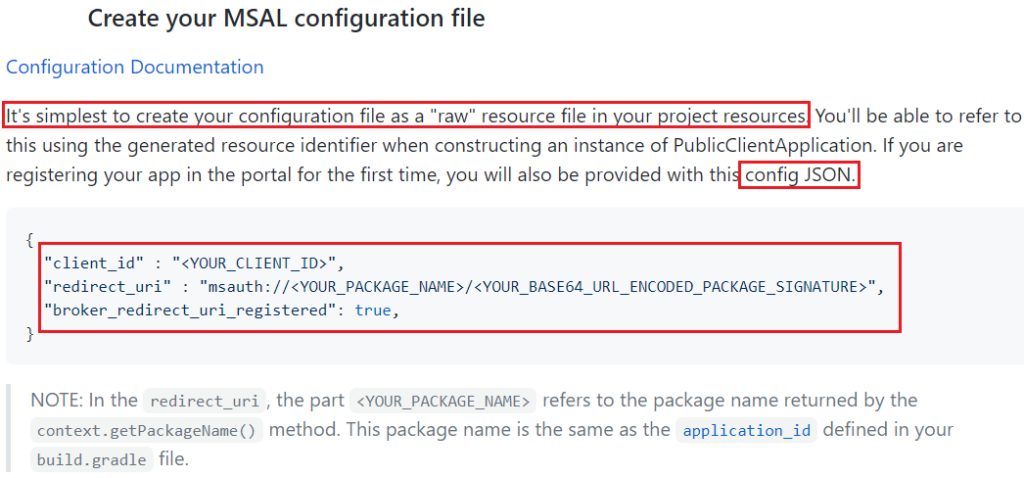
- The json file will contain, whatever we are getting from our Azure Registration.
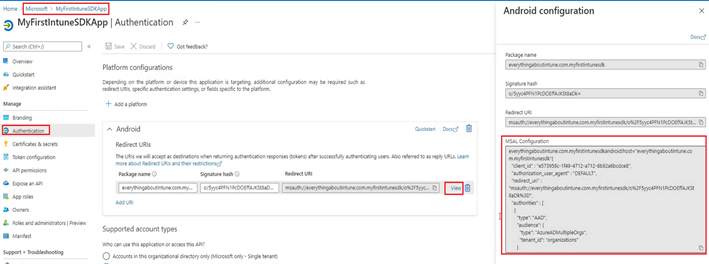
- It should look like the below once done-
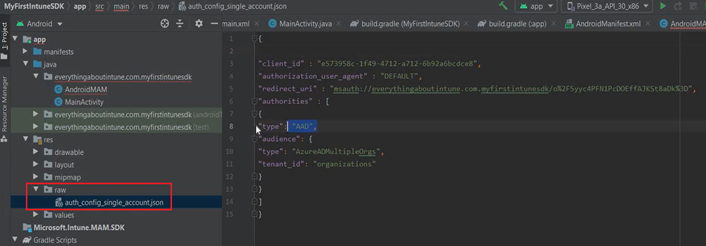
- Now we need to add the authority URL and redirect uri


- Once done, it should look like the below-
Step 11 – Creating the Interface
- Now we are going to create the interface which is going to have the buttons etc
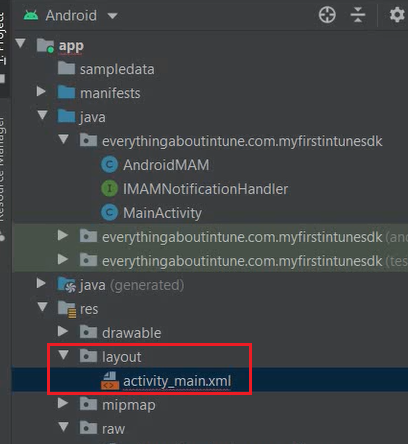
- We will add the layout at the below location by opening the activity_main in the layout.
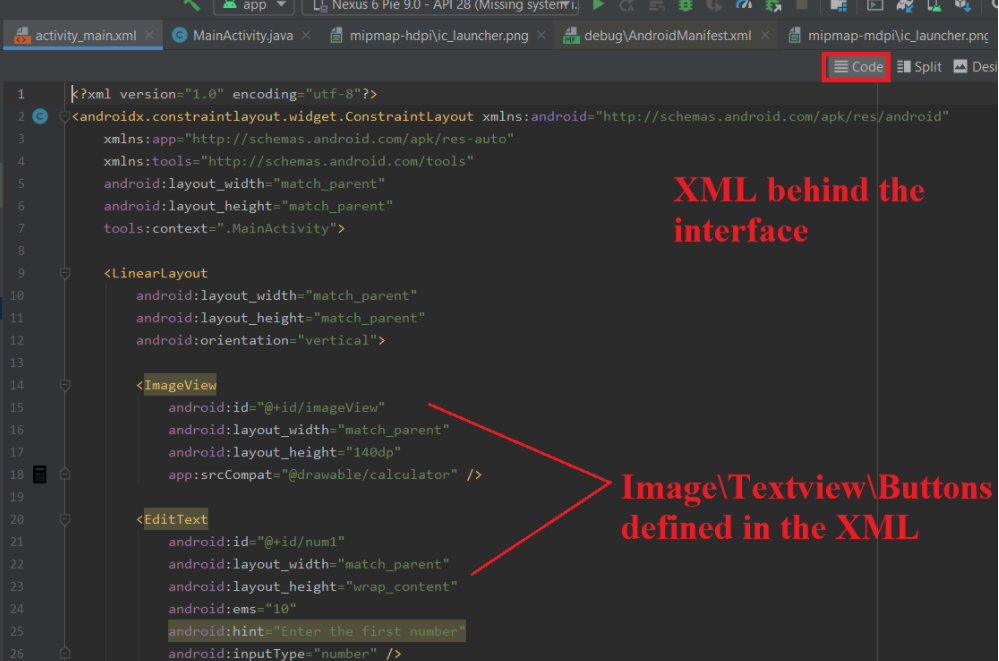
- We also have the XML editor wherein we can write the XML which defines how the application’s interface is going to look like.
- We can add buttons\interfaces to both the XMLs which would add the corresponding to the interface.
- All the buttons\Views in both the XMLs have ids which can be referenced in the code.
- The Android Studio has a layout designer which helps us visualize the app’s interface while we design the same.
- In the designer we can drag and drop icons\images\textviews\fields\buttons as per the interface required.
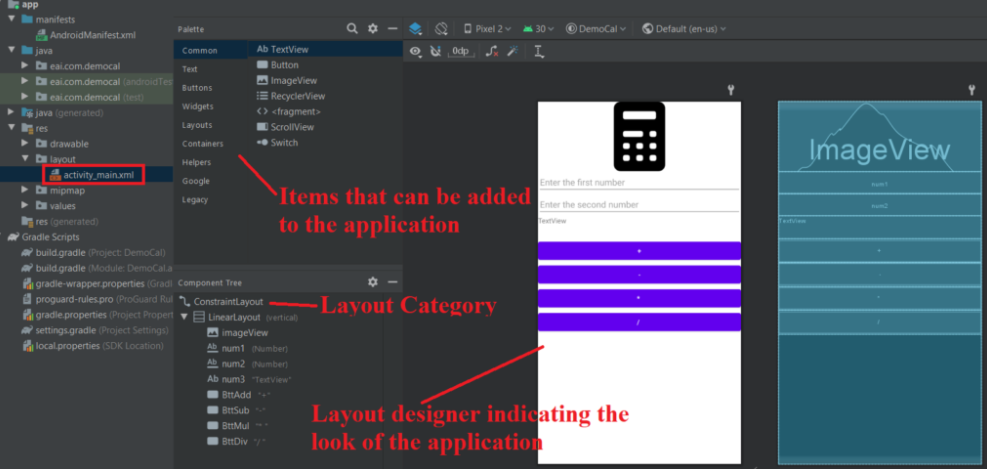
- The above app is now ready and can be targeted via MAM policy from Intune!
Did you know:
The latest version(14.3.5.0) of Microsoft Intune App SDK Xamarin Bindings (used for Intune sdk integrating apps built for Android\iOS in Xamarin)was released here on December 2019
This version might not support apps targeted at API 30 and above (i.e. Android 11+) and might cause issues during the sdk-integration\build
Microsoft may release a newer version of Microsoft Intune App SDK Xamarin Bindings to resolve the same.
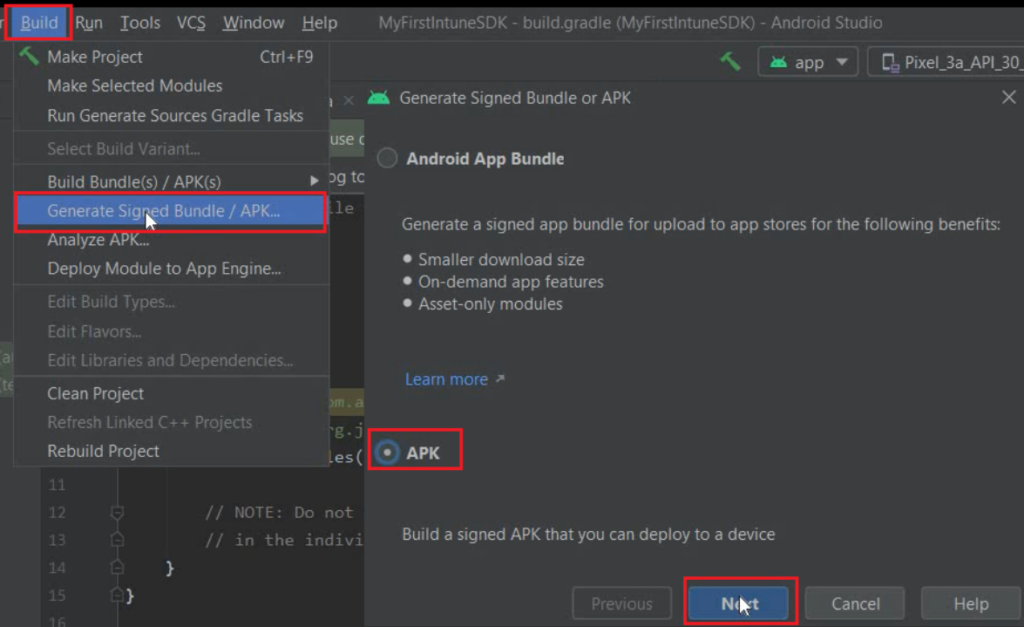
Generating the .apk
- Now we would Click on “Build”>And then “Generate Signed Bundle/APK” as shown below
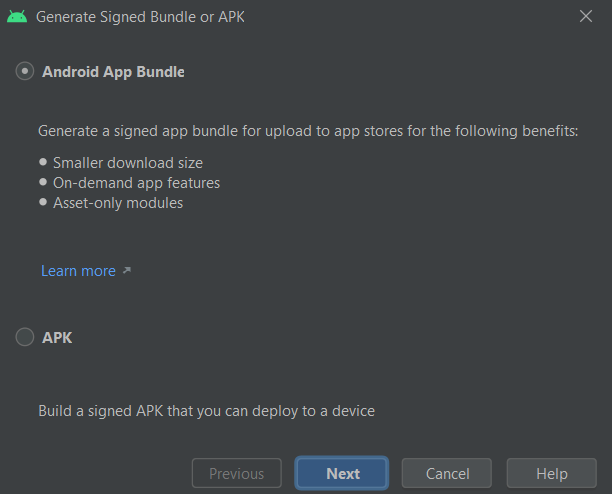
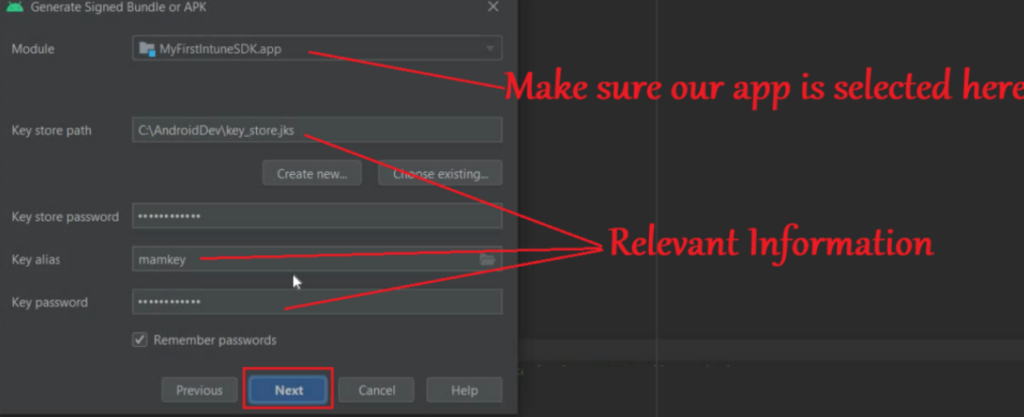
- We will make sure that the correct app is selected in the Module and will enter the keystore certificate and the relevant password(if it is not auto-populated)
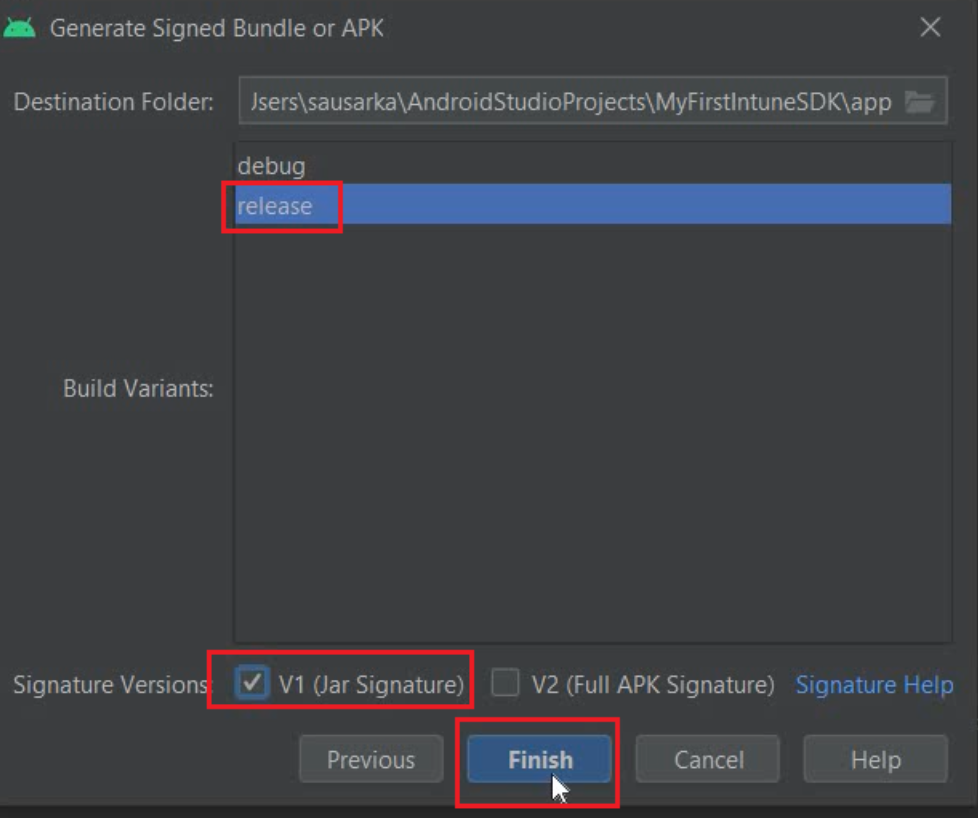
- We will now select “Release” and V1 Signature as shown below
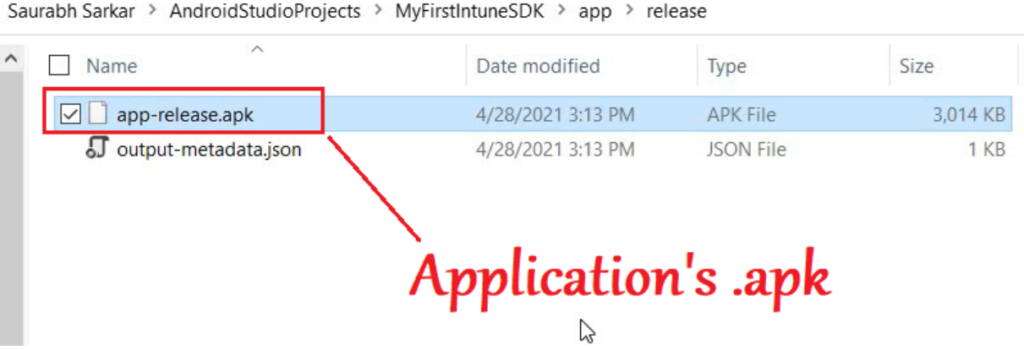
- The .apk will get generated using the source code and the location would be as shown below-(inside the module) which we can access via file explorer

Since now we have the .apk, we can deploy the same to devices via Intune. If the device is enrolled as Android Enterprise, we will have to upload the .apk to Managed Google Playstore.
Settings to be done at the Intune portal:
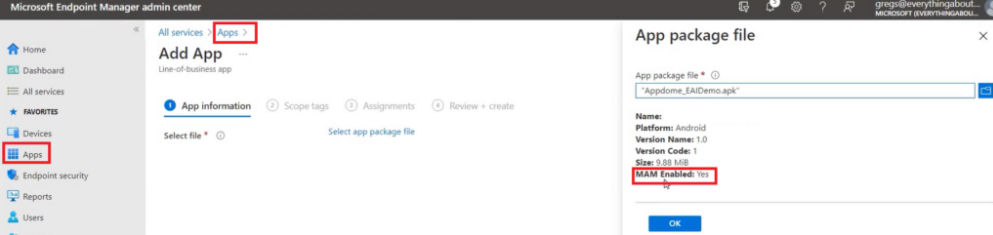
- Now we will go to the MEM portal>Go to Apps>Upload the application.
- Note: Under the ‘MAM Enabled’, the application shows as “YES“. This suggests that the Intune sdk integration was done successfully and the app can be potentially targeted via MAM policy (however this is not conclusive just yet)
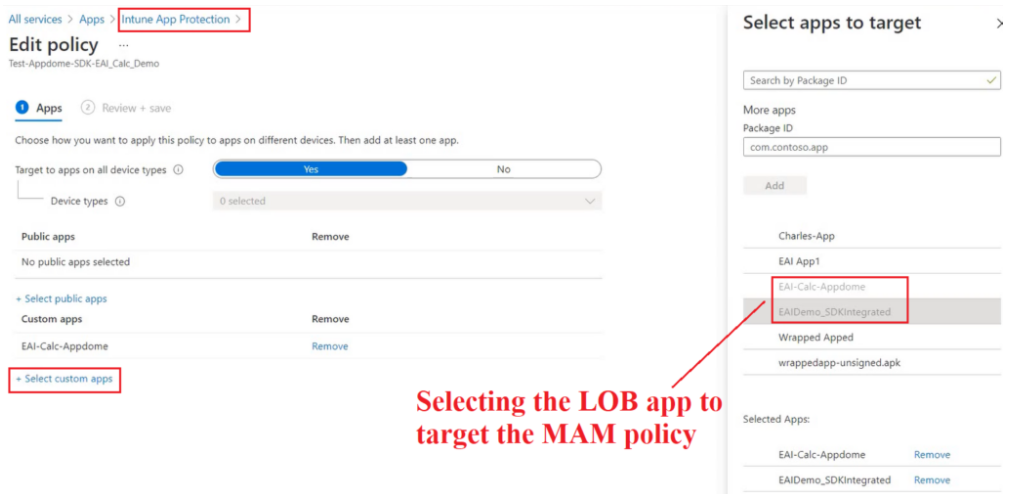
- Now since the application has been pushed to a user group, we can target a MAM policy to the same apps (and deploy it to the same user group). We will go to “Select Custom apps”>Select the application we have deployed.
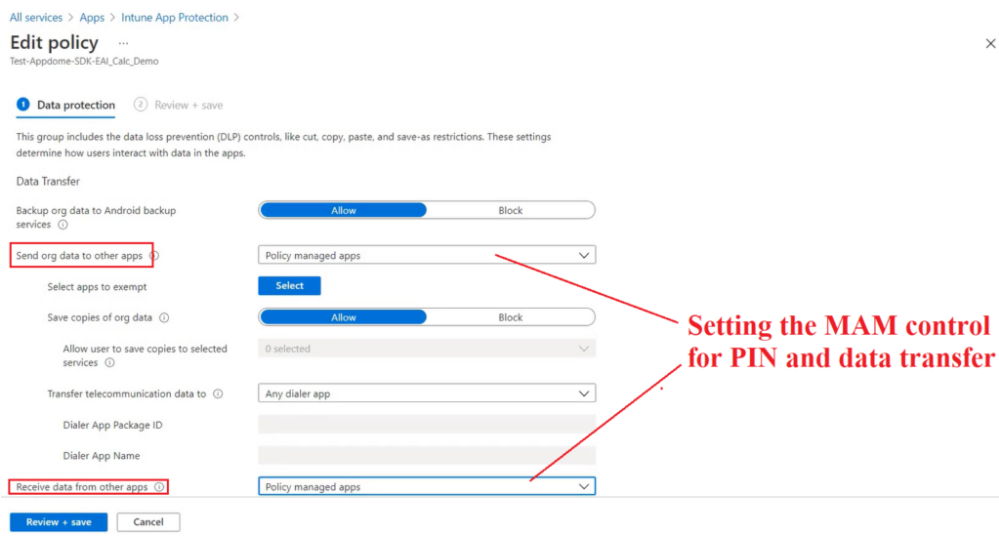
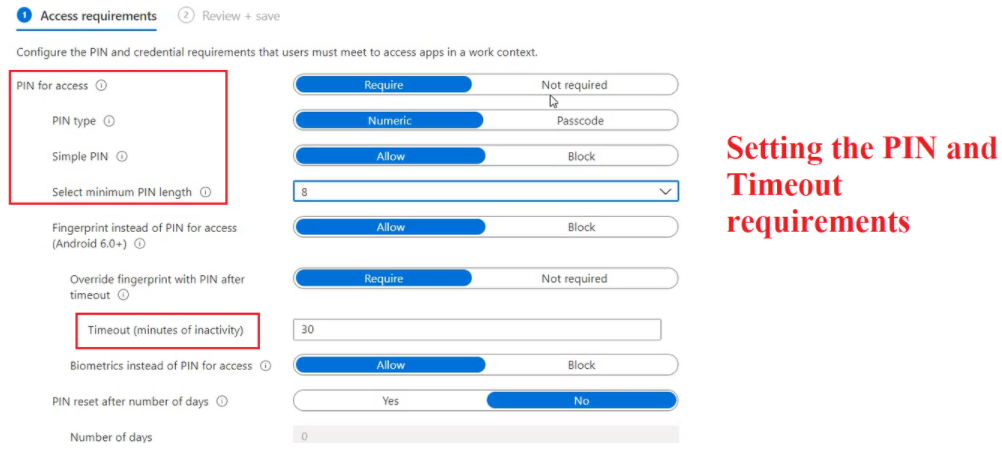
- In the settings of the MAM policy we can set the MAM control which defines the app’s behavior (like PIN\Timeout\Data leakage etc)
End Device Behavior:
- Now lets take a look over the application’s behavior on the device end, once targeted via the MAM policy.
- Once the app has been installed, upon launch, we see the same interface as viewed earlier in the emulator
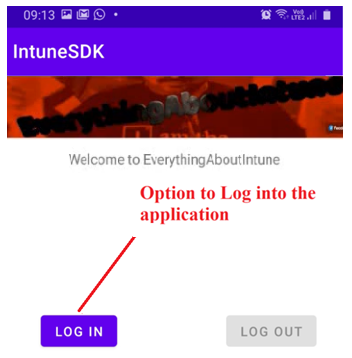
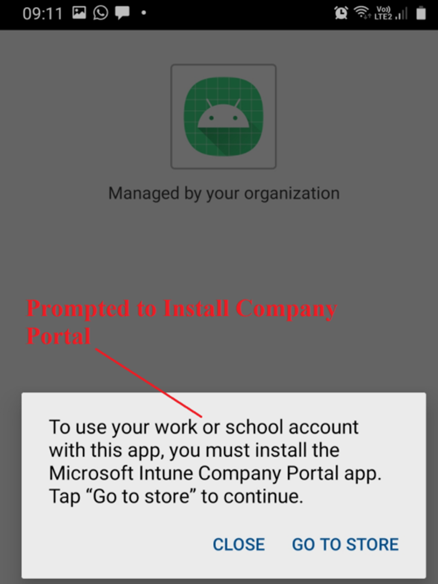
- Upon signing into the application, we are prompted to download and install the Company Portal app which would act as a broker for the MAM policies.
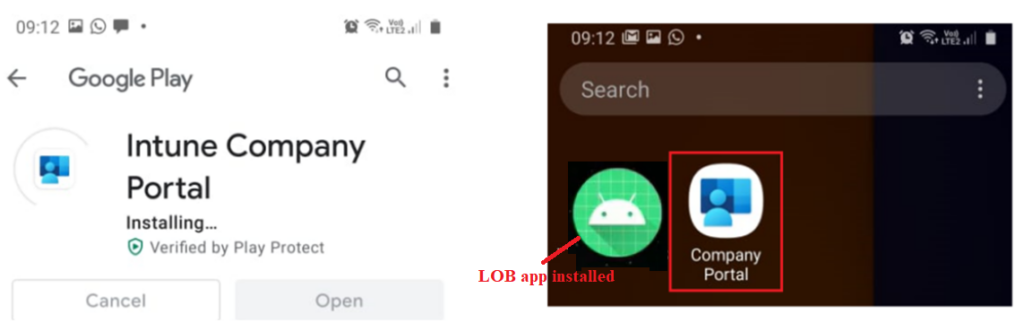
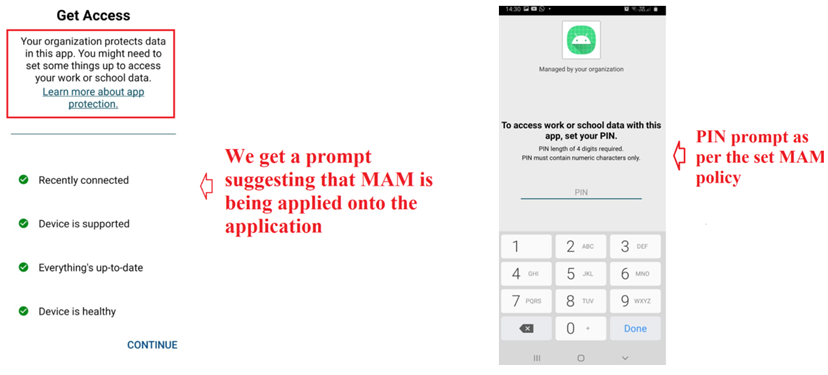
- Once Company Portal has been installed, the MAM policy kicks in and upon the next app launch we see the below screen substantiating that the app is managed by the organization and is PIN protected
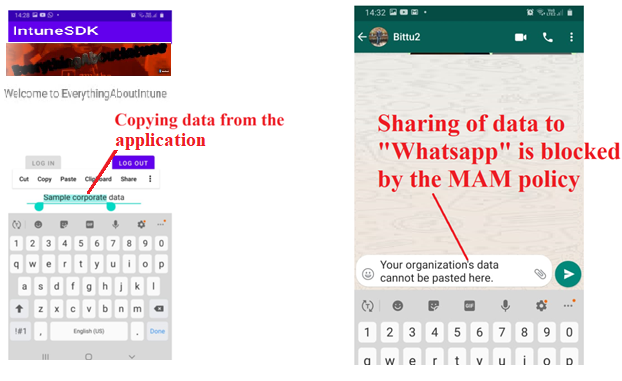
- Now if we try to move any data from our custom app to any unmanaged application(like Whatsapp etc), the action is blocked as shown below
Conclusion:
- I hope this blog has been helpful in understanding the various steps behind Intune sdk integration into an application.
- For more details, kindly checkout the MS official documentation here and here